
Table of Contents
5 Flower Drying Methods Compared
Pick the right method based on your time, budget, and how you want the finished flowers to look.
Method 1: Air Dry Flowers by Hanging (The Classic Approach)
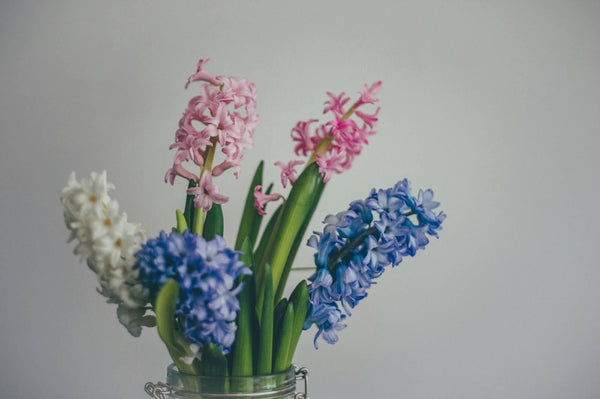
Hanging is the most popular flower drying method because it requires zero equipment and zero skill. You tie the stems together, hang them upside down, and wait. That is the entire process. If you want to air dry flowers at home, Singapore's air-conditioned rooms actually work well because the humidity is lower than outdoors.
How to do it: Strip all leaves from the stems (leaves trap moisture and grow mould). Bundle 3 to 5 stems together with string or a rubber band. Hang them upside down from a hanger, hook, or clothesline in a dark, dry room. The room needs airflow, so a spare bedroom with the aircon running periodically is ideal. Avoid bathrooms (too humid) and kitchens (steam from cooking).
Why upside down? Gravity pulls moisture away from the bloom and down through the stem. The petals dry in their natural open position rather than flopping forward. If you dry flowers right-side up, the blooms droop and dry in a sad, wilted shape. Upside down keeps the structure.
Timeline: 2 to 3 weeks in an aircon room. Up to 4 weeks in a naturally ventilated room during Singapore's wet season (November to January). You will know they are done when the stems snap cleanly instead of bending. If the stems are still flexible, give them more time.
Best flowers for this method: Roses (especially dark reds and pinks), lavender, baby's breath, hydrangeas, and eucalyptus. Roses are the single best flower for air drying because the petals are thick enough to hold their shape. Baby's breath dries almost perfectly with this method and looks nearly identical to fresh.
What to expect: Colours will fade and shift. Bright reds become deep burgundy. Pinks become dusty rose. Whites sometimes turn cream or light brown. This is normal, and many people prefer the vintage muted tones of naturally dried flowers. If you want the original colours preserved, silica gel (Method 3) is your better option.
Method 2: How to Press Flowers (For Flat Keepsakes and Art)
Learning how to press flowers is worthwhile if you want to use dried flowers for framing, card-making, resin art, scrapbooking, or any flat application. You will not get a 3D bloom from pressing, but you will get a perfectly flat, preserved flower that keeps its colour remarkably well.
How to do it: Place your flowers between two sheets of parchment paper (not cling wrap, not tissue). Open a heavy book (a phone book, textbook, or dictionary) and place the parchment sandwich inside. Close the book and stack 2 to 3 more heavy books on top. The pressure needs to be even across the flower.
Timeline: 2 to 4 weeks. Check at the 2-week mark. If the flowers feel papery and crisp, they are done. If they still feel slightly soft or cool to the touch, close everything up and wait another week. Rushing this step means residual moisture, which means mould later.
Best flowers for pressing: Flat or naturally thin flowers work best. Pansies, violets, daisies, ferns, and individual rose petals (not whole roses) are ideal. Thick, bulky flowers like full roses, peonies, and chrysanthemums do not press well because the centre retains moisture. If you want to press a rose, separate the petals and press them individually.
Singapore-specific tip: Our humidity makes mould a real risk during pressing. Change the parchment paper once at the 1-week mark to remove absorbed moisture. Some people add a few grains of silica gel inside the parchment layers as extra insurance. If you see any dark spots or fuzzy patches on the flowers at the 2-week check, the pressing has failed. Start again with fresh flowers and drier paper.
What to do with pressed flowers: Frame them behind glass for wall art, embed them in clear epoxy resin for coasters or phone cases, glue them onto handmade greeting cards, or laminate them as bookmarks. Pressed flowers from a wedding bouquet or a special occasion make particularly meaningful keepsakes. A framed pressed arrangement from your wedding flowers costs you maybe $15 in materials and becomes a permanent memento.
Method 3: Silica Gel (Best Way to Preserve Flowers at Home)
If you want to know how to preserve flowers so they look almost identical to fresh ones, silica gel is the answer. It preserves the original colour depth and the 3D shape of the bloom better than any other home method. The trade-off is cost: you need to buy silica gel crystals. A 2 kg bag costs $15 to $25 on Shopee or Lazada and is reusable indefinitely.
How to do it: Pour a 3 cm layer of silica gel crystals into an airtight container (a Tupperware or biscuit tin works perfectly). Place your flower bloom-side up on the layer. Gently pour more silica gel around and over the flower until the bloom is completely buried. Close the lid tightly. The silica gel absorbs all moisture from the flower over 3 to 7 days.
Why it works so well: Silica gel pulls moisture out of the petals evenly and quickly, before the cells have time to collapse and the pigments have time to oxidise. This is why the colours stay vivid. Hanging dries flowers slowly, which gives the pigments time to break down. Silica gel dries them fast enough that the colour is locked in.
Timeline: Small flowers (daisies, individual roses) take 3 to 4 days. Large blooms (peonies, hydrangeas, sunflowers) take 5 to 7 days. Do not rush it. If you remove the flower too early, it still has internal moisture and will wilt within days.
Best flowers for silica gel: Everything. Seriously, every flower dries well in silica gel. But the method particularly shines with flowers that lose their colour or shape with other methods: roses, peonies, gerberas, orchids, and carnations. A red rose dried in silica gel retains a deep, vivid red rather than the dark burgundy you get from air drying.
Reusing the silica gel: After each use, the crystals absorb moisture and lose effectiveness. To recharge them, spread the crystals on a baking tray and bake at 120 degrees Celsius for 2 hours. They will return to their original dry state and work just as well as new. One bag of silica gel can be reused dozens of times.


Method 4: Dry Flowers in the Microwave with Silica Gel (The Fast Track)
If you do not want to wait 3 to 7 days for silica gel alone, this microwave method compresses the entire process into 2 to 5 minutes. You still need silica gel, but the microwave speeds up the moisture extraction dramatically. For anyone who wants DIY dried flowers without the long wait, this is the fastest reliable option.
How to do it: Place a 2 cm layer of silica gel in a microwave-safe container (no metal lids). Set the flower on top and gently cover it with more silica gel. Do not cover with a lid. Microwave on medium power (50%) for 1 minute. Check the flower. If the petals still feel soft, microwave for another 30 seconds. Repeat in 30-second intervals until the petals feel papery. Let the container sit for 20 minutes after microwaving to cool gradually.
The gradual cooling step is critical. If you pull the flower out immediately after microwaving, the rapid temperature change can crack the petals. Twenty minutes of cooling inside the silica gel lets the flower stabilise. Skip this step and you will end up with crumbled petals instead of a preserved bloom.
Total time per flower: 2 to 5 minutes of microwaving plus 20 minutes of cooling. Compared to 2 to 3 weeks for hanging or 3 to 7 days for standard silica gel, this is dramatically faster. You can dry an entire bouquet in under an hour.
Best flowers for microwaving: Roses, daisies, chrysanthemums, and small to medium blooms work well. Avoid very thick or water-heavy flowers like sunflowers and peonies. Their high moisture content means uneven drying, which leads to scorched outer petals and a still-damp centre. For those flowers, stick to standard silica gel.
Risk factor: There is a learning curve. Your first attempt might not be perfect. The timing depends on your microwave's power output, the flower size, and how much moisture is in the bloom. Start with a single flower you do not mind losing, find the right timing for your microwave, and then apply that timing to the rest of the bouquet.
Method 5: Oven Drying (The Middle Ground)
Oven drying sits between hanging (slow, easy) and microwaving (fast, risky). It takes 1 to 3 hours, requires no special equipment beyond a baking tray, and produces decent results. It is particularly useful in Singapore during monsoon season when the humidity is too high for reliable air drying.
How to do it: Preheat your oven to the lowest setting, ideally 60 to 80 degrees Celsius. If your oven's minimum is higher than 100 degrees, prop the door open slightly to reduce the effective temperature. Line a baking tray with parchment paper. Arrange the flowers in a single layer with space between each one. Place the tray in the oven and check every 30 minutes.
Timeline: 1 to 3 hours depending on the flower type and your oven temperature. Thin-petalled flowers (daisies, baby's breath) dry in about an hour. Thicker blooms (roses, carnations) need 2 to 3 hours. The flowers are done when the petals feel crisp and papery but are not yet browning at the edges.
Temperature is everything. Too hot and the flowers cook instead of drying. You will know you have gone too hot if the petals turn brown, curl excessively, or become brittle and crumbly. The goal is to evaporate moisture slowly at low heat, not to bake the flowers. Think "warm airing cupboard," not "roasting chicken."
Best flowers for oven drying: Hardy flowers with naturally robust petals work best. Roses, lavender, baby's breath, and small wildflowers handle oven heat well. Delicate flowers like orchids and tulips tend to brown or curl at the edges even at low temperatures. For those, stick to silica gel.
Singapore tip: If your oven only goes down to 150 degrees Celsius (common with older HDB ovens), this method will not work well. The temperature is too high for gentle drying. Use the hanging method with your aircon running instead, or invest $20 in silica gel for the best results.
If you would rather skip the DIY entirely and get professionally preserved flowers that last 1 to 3 years, browse our preserved and dried flower collection. These are preserved using industrial-grade processes that maintain colour, shape, and even a soft petal texture that home methods cannot replicate.
Want Flowers Worth Preserving?
Start with the freshest blooms for the best dried results. Or skip the DIY and browse our professionally preserved collection. Free delivery, no GST.
Shop Preserved FlowersFrequently Asked Questions
Which flowers are easiest to dry at home?
Roses, baby's breath, lavender, and hydrangeas are the four easiest flowers to dry at home. They have naturally low moisture content and hold their shape well during the drying process. Baby's breath is the most forgiving for beginners.
How long do dried flowers last?
Properly dried flowers last 1 to 3 years if kept out of direct sunlight and away from high humidity. In Singapore's climate, display them in aircon rooms rather than near windows. Spray with unscented hairspray for extra durability.
Can you dry flowers in Singapore's humidity?
Yes, but you need to manage the environment. Air drying works best in aircon rooms (around 24 degrees Celsius, 50 to 60% humidity). Silica gel works regardless of room humidity because the container is sealed. Avoid drying flowers in naturally ventilated rooms during monsoon season.
How do you keep dried flowers from crumbling?
Spray them lightly with unscented hairspray once they are fully dry. This seals the petals and prevents them from shedding. Handle dried flowers gently, as the petals become brittle. Display them in a location where they will not be bumped or knocked.
Is it better to buy preserved flowers or dry them yourself?
DIY drying is satisfying and cost-effective if you enjoy the process. Professional preservation produces superior results: colours stay vivid for years, petals remain soft to the touch, and the flowers are treated against mould and UV damage. If you want gallery-quality results without the trial and error, professionally preserved flowers are worth the investment.
Share This Article

Jim Ng
Owner of Singapore FloristJim Ng is the owner of Singapore Florist, the boutique flower studio first opened in 1987 by its founding family. Jim and his team acquired Singapore Florist from the original owners with one promise: keep the craft, keep the customer relationships, and modernise everything else. Today the studio works out of Eunos Techpark, ships fresh stems islandwide, and has grown its review base past 202 verified Google reviews.
This article is part of an ongoing, well-researched flower-care library written by the Singapore Florist team, drawing on nearly four decades of hands-on bouquet design, daily delivery experience, and direct relationships with growers across Asia. If you spot anything we have missed or have a specific flower question, WhatsApp us directly and we will weave the answer into a future post.