
Table of Contents
Creating a flower bouquet is both an art and a deeply satisfying activity.
Whether you're planning to gift it to someone special or add a touch of elegance to your home, a bouquet reflects personal taste and creativity.
With the proper guidance, anyone can craft a stunning arrangement. Let’s dive into the step-by-step process to make your flower bouquet, even if it’s your first time!
Step 1: Gather Your Tools And Materials
Before you begin, having the right tools and materials ready is key. Here’s what you’ll need:
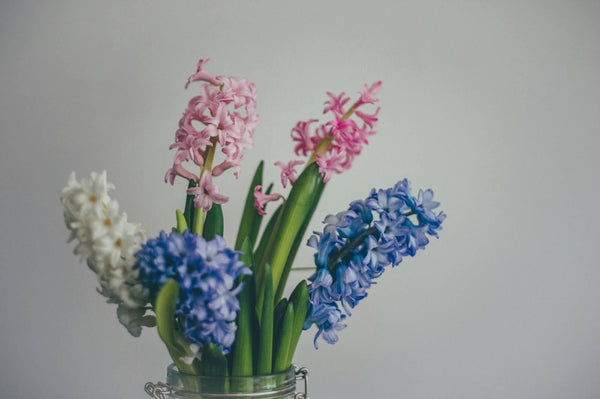
- Fresh Flowers: Choose a mix of blooms and greenery that complement each other in colour, texture, and size.
- Sharp Scissors or Floral Shears: For clean cuts and sharp nips.
- Vase or Wrapping Paper: This is used to display or gift the bouquet.
- Floral Tape or Twine: To hold the arrangement together.
- Water and Floral Preservative: To keep flowers fresh longer.
- Optional: Decorative ribbons or accessories to add a finishing touch.
Tip: Select half-bloomed flowers for longevity, as fully bloomed flowers may wilt faster.
Step 2: Select And Prepare The Flowers

Choose The Right Flowers
When selecting your flowers, think about the occasion and the recipient. Here are a few factors to consider:
Focus on a Theme: Opt for roses and carnations for a romantic look or sunflowers and daisies for a cheerful, summery feel.
Mix Focal Flowers and Fillers: Focal flowers like roses and lilies draw attention, while filler flowers like baby’s breath eucalyptus provide balance.
Consider Flower Longevity: When selecting flowers, consider how long they will last. Sturdier blooms like chrysanthemums and alstroemeria stay fresh longer than delicate flowers like peonies.
Incorporate Fragrance: Fragrance adds another dimension to your bouquet. Flowers like lilies, gardenias, and lavender look beautiful and offer a delightful aroma. However, be mindful of strong scents that might not suit every recipient.
Play with Sizes and Textures: Combine flowers of different sizes and textures for an engaging and dynamic arrangement. For example, pair soft-petaled roses with spiky proteas or textured greenery to create visual interest.
Trim The Stems
Using floral shears, cut the stems at a slanted 45-degree angle, this angled cut increases stem water absorption, ensuring the flowers stay hydrated.
- Trim off any leaves below the waterline to avoid rotting and bacteria build-up.
- For thorny flowers like roses, gently remove the thorns to prevent injury.
- To rehydrate the flowers that have been out of water for a while, place the freshly trimmed stems in a vase of lukewarm water for at least an hour.
- For flowers with hollow stems, you can seal the hole by dipping the stem in boiling water for 30 seconds. This prevents air bubbles from blocking the flower's ability to absorb water, extending the blooms' life.
Step 3: Decide On A Style And Colour Scheme
Consider the bouquet’s purpose. Do you want a loose, garden-style arrangement or a compact, formal design? Your choice will influence how you arrange the flowers.
Choose A Colour Palette
A harmonious colour scheme can elevate your bouquet’s appeal. Popular choices include:
- Monochromatic schemes (shades of one colour)
- Contrasting colours (yellow and purple, orange and blue)
- Seasonal hues (pastels for spring, deep tones for autumn)
- Consider the Recipient's Preferences (Tailor the bouquet to the recipient’s preferences)
- Include Neutral Shades: (Muted colours allow vibrant blooms to stand out more)
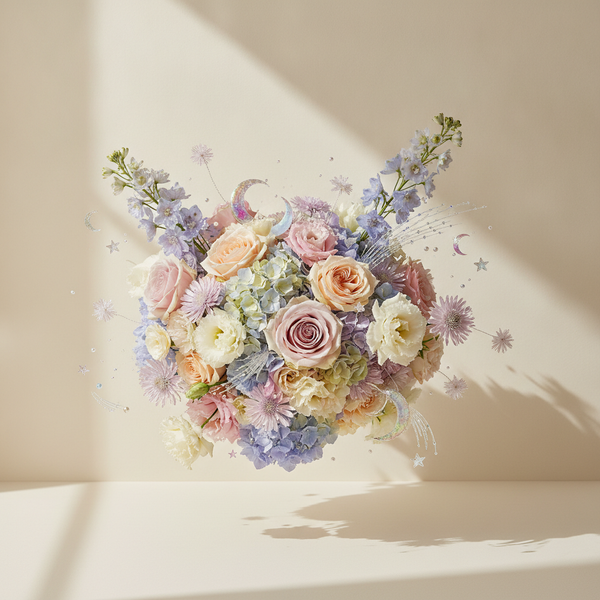
Step 4: Arrange The Flowers
Start With Focal Flowers
Choose 2-3 of your most striking blooms as focal flowers. These could be your bouquet's largest, most vibrant, or most unique flowers.
Hold these focal flowers in your hand, imagining them as the centrepiece of your arrangement. One great way to achieve this is to picture your bouquet's overall shape and size mentally, keeping the focal flowers in mind as the anchor points.
Add Supporting Flowers
As you add each supporting flower, rotate the bouquet in your hand to ensure an even distribution of flowers and prevent the arrangement from becoming lopsided.
Add variety to the heights of the supporting flowers to create depth and visual interest.
Incorporate Greenery
Once your centrepiece is placed, introduce greenery such as ferns, eucalyptus, or other leafy branches to add depth and fill any gaps in the floral arrangement. Place greenery around the edges of the bouquet or weave it delicately between the blooms for a more natural and flowing look.
Greenery balances the colours and shapes of the flowers, creating a harmonious overall composition.

Step 5: Build The Bouquet Layer By Layer
Create Depth and Balance
- Proper Layering is key to achieving a balanced and visually appealing arrangement.
- Alternate between larger blooms, which serve as focal points, and smaller filler flowers to create depth and texture.
- Consider incorporating flowers with varying heights to add dimension to the bouquet.
Maintain a Spiral Shape:
- Arrange the flowers in a slight spiral pattern to ensure the bouquet holds its shape and presents a professional look.
- Start with the focal flowers at the centre and gradually add supporting flowers and greenery, spiralling outward.
- This technique creates a visually pleasing rounded shape and makes it easier to bind the stems later.
Step 6: Secure The Arrangement
Binding the Stems
- Once you are satisfied with the arrangement, use floral tape or twine to bind the stems together securely.
- Wrap tightly but gently to avoid damaging the stems.
- Ensure all the stems are held firmly together to prevent the bouquet from falling apart.
Professional Finishing Touches
- Even Stem Lengths: Cut all the stems to an even length for a more polished look.
- Balance and Symmetry: Gently adjust the bouquet to ensure it feels balanced and symmetrical in your hands.
Step 7: Add Final Touches
Wrapping Your Bouquet:
- Select decorative paper that complements the flowers' colours and style. Kraft paper or coloured wrapping paper are popular choices.
- Fold the paper around the stems and secure it with tape or ribbon.
- Consider adding a decorative ribbon or a small sprig of greenery to the wrapping for an extra special touch.
Arranging in a Vase
Place your masterpiece of a bouquet in a vase filled with fresh water and floral preservatives. Ensure the stems are submerged in the water but not overcrowded.
Common Mistakes To Avoid

Overcrowding The Bouquet
When too many flowers are packed together, the bouquet can lose its charm and become visually overwhelming. Each bloom needs enough space to be appreciated.
Overcrowding also restricts airflow, causing flowers to wilt faster. Always aim for balance and leave room for each flower to shine.
Ignoring Proportions
The arrangement can appear unbalanced if the focal flowers are too large compared to the fillers or greenery.
Similarly, too many small blooms without larger focal points may make the bouquet look busy. Always consider the size and scale of each flower to maintain harmony.
Skipping Stem Preparation
Flowers with unprepared stems struggle to absorb water, leading to faster wilting. Always trim stems at a 45-degree angle and clean off excess foliage to promote freshness.
Choosing Clashing Colours
Combining colours that do not complement each other can result in a bouquet that looks chaotic rather than cohesive. Plan your colour scheme thoughtfully, focusing on enhancing the arrangement's harmony and contrast.
Neglecting Flower Health
Using flowers that are already wilting or have damaged petals can affect your bouquet's overall look and longevity. Always inspect each bloom for freshness and avoid those with brown spots or drooping heads.
Using Too Few Greenery Elements
Without enough greenery, the arrangement might lack depth and appear incomplete. Be sure to include leaves, ferns, or eucalyptus to frame and highlight your flowers.
Conclusion On How To Make Flower Bouquet
Creating a flower bouquet is a wonderful way to express creativity and bring artistry to any occasion. By following this simple step-by-step guide, you can craft a beautiful arrangement that perfectly suits your style and the recipient’s preferences.
If you’re short on time or looking for professionally crafted arrangements, consider exploring the best hand bouquets Singapore has to offer!
Singapore Florist is a trusted name for expertly designed floral arrangements and exceptional service. With a wide range of flowers, customisation options, and island-wide same-day delivery, we offer a wide array of arrangements, ranging from wedding bouquets to graduation bouquets in Singapore, we make it easy to bring your floral vision to life.
Visit Singapore Florist to find the perfect bouquet, or let our skilled team handle your floral needs with care and creativity.
Let your flowers speak for you!
Frequently Asked Questions About How To Make Flower Bouquet
What Are The Best Flowers For Beginners To Use In Bouquets?
Simple flowers like daisies, roses, and carnations are easy to work with and widely available.
Is It Better To Use Fresh Or Artificial Flowers For Bouquets?
Fresh flowers offer natural beauty and fragrance, while artificial ones are durable and reusable.
Should You Add Water To A Bouquet Before Wrapping It?
No, but you can use a damp paper towel around the stem ends to keep them hydrated.
What Is The Best Way To Store Fresh Flowers Before Arranging Them?
Keep them in cool water in a fridge or shaded area to maintain freshness.
How Often Should You Replace Water In A Vase Arrangement?
Replace the water daily and add floral preservatives to extend the life of the flowers.
How Can You Keep Wrapped Bouquets Fresh During Transport?
Use a damp paper towel around the stems and wrap it in plastic to retain moisture.
Share This Article

Jim Ng
Owner of Singapore FloristJim Ng is the owner of Singapore Florist, the boutique flower studio first opened in 1987 by its founding family. Jim and his team acquired Singapore Florist from the original owners with one promise: keep the craft, keep the customer relationships, and modernise everything else. Today the studio works out of Eunos Techpark, ships fresh stems islandwide, and has grown its review base past 202 verified Google reviews.
This article is part of an ongoing, well-researched flower-care library written by the Singapore Florist team, drawing on nearly four decades of hands-on bouquet design, daily delivery experience, and direct relationships with growers across Asia. If you spot anything we have missed or have a specific flower question, WhatsApp us directly and we will weave the answer into a future post.